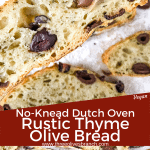

Dutch Oven No Knead Rustic Thyme Olive Bread recipe is full of flavor! A perfect bread for Italian meals.
. Simple to make Italian bread. #homemadebread #olivebread #dutchovenbread #nokneadbread")
This post contains affiliate links.
I have always loved olives. When I was a kid, I would walk around with a black olive stuck on each finger and eat them.
Something about the salty, somewhat sour brine of an olive makes me happy.
And when I lived in Italy for college, I fell in love with olive trees, inspiring the name of this blog.
Making a no knead easy olive bread recipe has been on my list! Find more of our bread recipes here!
. Simple to make Italian bread. #homemadebread #olivebread #dutchovenbread #nokneadbread")
Preparing the Olives
It is important to dry the olives before adding to the dough to remove as much of the brine as you can.
This is mildly painful for me because I LOVE olives and LOVE brines but the extra moisture could negatively impact your bread and cooking time.
No need to be obsessive about making the olives completely dry, just don’t throw them in the dripping with moisture. One quick rub with a towel or drained in a colander should do the trick.
. Simple to make Italian bread. #homemadebread #olivebread #dutchovenbread #nokneadbread")
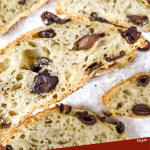
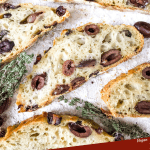
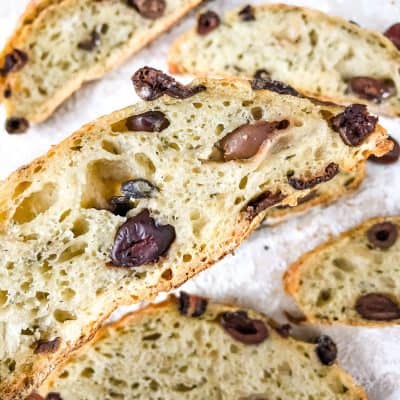
I also like to leave half of the kalamata olives whole, and cut the others just in half.
My goal is to get olives alllllll over the place in the bread but still leave them in pretty big chunks.
The olives will be cut more as you cut the bread, so make them as large or small as you like.
You could use any olive variety you like, just make sure there are no pits in them!
. Simple to make Italian bread. #homemadebread #olivebread #dutchovenbread #nokneadbread")
Cooking the Bread
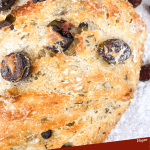
When you are cooking the Dutch oven bread, you want to make sure you get a really nice golden brown crust which helps indicate that the bread is cooked through.
Sometimes I can smell the bottom of the bread almost burning before it is done.
To prevent this, put a layer of flour in the pot before you add the dough (the flour scrapes off later, it does not stick, so it is fine if the flour ends up bringing).
Or add an empty baking sheet on a rack under the bread pot. I got this tip from a friend that cooks a lot of bread and the pan will help disperse heat a little and put less heat pressure on the bottom of the pot.
No Knead Breads
. Simple to make Italian bread. #homemadebread #olivebread #dutchovenbread #nokneadbread")
No Knead Rustic Thyme Olive Bread
Ingredients
- 3 cups all purpose flour
- 1/2 teaspoon instant yeast
- 1 1/2 cups kalamata olives drained and dried
- 2 teaspoons dried thyme (or rosemary)
- 1 1/2 teaspoons salt
- 1/2 teaspoon black pepper
- 1 1/2 cups water
Instructions
- Combine all of the ingredients in a large mixing bowl. The dough will not be overly sticky but should come together. Add just a little water at a time if needed to incorporate all the flour.
- Cover the dough with plastic wrap or bees wax wrap (something not porous) and put a towel over the top to help it seal. Set the bowl aside for at least 8 hours to rise (I have gone as long as 24 hours).
- When ready to bake, heat oven to 450F. Place a large cast iron pot (dutch oven) on the medium or medium low rack while preheating for it to get hot.
- Use a spatula to scoop the dough into the hot pot. (If preferred, shape the dough on the counter during preheating but I find it is easy to drop the dough in a rough circle straight into the pot).
- Place the lid on the pot and cook at 450F for 30 minutes.
- Remove the lid and let cook an additional 15 minutes to further brown. If it looks or smells done sooner, remove from oven sooner.
- Let the bread cool completely on a cooling rack.
This bread looks absolutely marvellous! We love olives here too and this would be so popular in our house. Thank you for the tips too, what a good idea to put a layer of flour under the bread.
re: hard bottom crust, cooking too fast. check oven temperature calibration. In my case my electric oven was 50F too high. I used my remote oven thermometer to determine the true temperature.
Hi Peter,
Very true! My oven runs a little hot as well and it can make a big difference not only in cooking time but what happens to food. Sounds like you have a great solution!
Is the dough supposed to rise?
Yes, it should puff up and look like a very soft and wet dough after mixing everything and letting it sit overnight. If it does not, it could mean your yeast is dead or that regular yeast was used instead of instant yeast.
This bread is delicious! I love kalamata olives, but am even happier about the whole tasty combo of the thyme and peppery bite that hits along the way. Crunchy and tender – I think this will become a favorite. Thanks for the tip for dispersing heat. It worked like a charm!
So glad you liked it, Karin! 🙂
Can I use my cast iron skillet? I don’t have a pot. Thanks for the recipe it looks so good
Hi Sal,
Yes, I would think that would work, just make sure you have a lid of sorts for the first part of cooking! Anything heavy that seals on top (not sitting too loosely) should work. Also, depending on your cast iron skillet size, you might need to divide the dough into batches based on how full it is since the dough will rise some.
This bread turned out great! It’s delicious. I used an enameled Dutch oven and the bread stuck pretty badly to the bottom. Next time, I’d grease it. But I got the bread out unharmed by putting the lid back on and letting it steam to soften the crust. Great recipe! Will definitely make again.
Use a square/piece of parchment paper to cradle the dough. No stick.
Great recipe!! Turned out very nice!!
this is absolutely INCREDIBLE!!! so delicious and chewy. I didn’t put much salt in it because I knew the olives would add the salt.
Can I add pistachios to this recipe?
Absolutely! I bet that would taste great!
Delicious!
Great recipe and it’s delicious but my bread came out a bit thick and heavy, is that supposed to be like that?
Hi Rad,
Glad you liked it! It is a rustic bread so definitely denser than a French bread and will hold its shape much more than an airy bread when you squeeze it. I would say it is similar to the bread baskets you get in restaurants, like Outback’s rye bread or a ciabatta bread.
Hi Kim,
Thanks for sharing this recipe. It looks amazing and I’d like to try it. After the 8 or 24th s, can I cut the dough and put them in a muffin pan to make rolls instead. Would the cooking time be lessened and the temperature different?
Thank you,
Hi Daphnee,
I have not tried that, but it is a great idea! Yes, I think a muffin tin would work. I would definitely think the cooking time would be reduced. I would start with cooking 15 minutes and taking a peak at that point. If they are getting too dark too fast, cover them with foil (can be loose). If you tap the bottom of the bread, it should sound a little hollow.
You can take each portion of dough and fold the edges under the ball so the top is smooth to give you a smoother, prettier mini loaf 🙂
This is a great recipe. It was super easy and most importantly very tasty. I will be making this again.
Tried the recipe. Let it rise for about 10 hours and it doubled in size then when I cooked it it went flat and came out looking shiny and black tinged. Any idea what I did wrong? I thought my dough looked as you described but I don’t usually work with wet dough.
Hi Eryn,
I am so sorry that happened! I have not experienced it myself so not quite sure what happened.
Was all of the dough a black tinge? It is possible that is from the olive juice that was attached or in the olives? Maybe pat the olives dry first and/or add another 1/4 cup of flour.
An easy-to-follow recipe, and comes out amazing every time!
How wonderful! So glad you like it!
I made this recipe, turned out awesome. Was so easy to make, and the house smelled so good when baking. Will definitely make this again.
I am so glad you liked it!!
I have made this 3 times now, it is delicious and super easy.
So yummy! Made after dinner and let it rise all night and then threw it in, in the morning. Probably will cut olives in half next time. Might try using this as a base dough and then changing to be garlic loaf instead of olive. Bf said “ I’d be happy if I got this at a restaurant”
What a compliment! A garlic loaf sounds amazing!
This tastes amazing and was super easy to make. A family hit!
So happy to hear it! 🙂
Excellent bread recipe. I just made it this afternoon. I love olives too !
A fellow olive lover!! So glad you like it!!